Lab 26 Installing the VMware vCenter Server Components

Lab 26 Installing the VMware vCenter Server Components

We have to install the vCentre to our virtual machine. 

To do that,
Open the Setup file of the VMware vCentre Server and follow the instructions.

Screen Shot 2018-01-23 at 11.47.31 AM

You can even continue without license key.

Screen Shot 2018-01-23 at 11.47.45 AMScreen Shot 2018-01-23 at 11.49.59 AMScreen Shot 2018-01-23 at 11.50.09 AMScreen Shot 2018-01-23 at 11.50.47 AMScreen Shot 2018-01-23 at 11.52.37 AMScreen Shot 2018-01-23 at 11.53.24 AMScreen Shot 2018-01-25 at 10.42.57 AMScreen Shot 2018-01-25 at 10.43.45 AMScreen Shot 2018-01-25 at 10.48.45 AMScreen Shot 2018-01-25 at 10.50.26 AM

After the SQL support files, vCentre Server will start and finish within few minutes.

Screen Shot 2018-01-25 at 10.51.09 AM

End of the post
Thank you 

Lab 25 VMware vSphere Update Manager

Lab 25 VMware vSphere Update Manager

PLEASE NOTE : We are facing a technical issue in our virtual environments at the College. Therefore I am going to describe the labs now onwards without showing any steps or screenshots. When possible I will add images and steps. 

With update manage you can,

  1. You can upgrade patches in ESXi
  2. Install and update third party softwares 
  3. Upgrade virtual machine hardware

Update Manager is inbuilt in the vSphere web client. After install the update manager, it will appear under the monitor tab in vSphere web client. 

you can use the Update Manager Web Client to view scan results and compliance states for vSphere inventory objects, and later remediate them from the Update Manager Client plug-in in the vSphere Client.

Lab 23 Configuring VMware vSphere Fault Tolerance

Lab 23 Configuring VMware vSphere Fault Tolerance

PLEASE NOTE : We are facing a technical issue in our virtual environments at the College. Therefore I am going to describe the labs now onwards without showing any steps or screenshots. When possible I will add images and steps. 

Log into the vCentre 
Select the virtual machine and select edit settings. Then select the CD-ROM device and change the type of the ROM to “Client Device” 
Set Device Mode : Passthrough CDROM.

Screen Shot 2018-02-13 at 11.16.13 PM.png

Go to VM Options –> Advanced
Add a new parameter as follows
Name: relay.supported
Value: True

Name: replay.allowFT
Value: True

Name: replay.allowBTonly
Value: True

Click Ok

Now if you click the host and check the host summary it will show you the Fault Tolerance feature is not configured. We have to configure it. 


To do that, select the vMotion adapter and go to the settings. 

Screen Shot 2018-02-13 at 11.23.08 PM.png

Click on the Cluster, and from the options turn on the fault tolerance 

Screen Shot 2018-02-13 at 11.23.59 PM.png

End of the post
Thank you 

Lab 21 Using VMware vSphere High Availability

Lab 21 Using VMware vSphere High Availability

In this lab, I am going to show how to create a high availability for virtual machines using vSphere HA.

Go to the datacentre and create a new cluster. 
when the creating wizard pop-up enter the name 
vSphere HA – Turn On
Policy – Percentage of cluster resources reserved as failover space capacity
Click OK.

Screen Shot 2018-02-12 at 1.39.12 PM.png

Add ESXi host to the newly created cluster. 

Next step is, Select the vMotion Network adapter in ESXi in the cluster. Select the adapter and go to edit settings. 

Select “Management Traffic”
Screen Shot 2018-02-12 at 1.42.45 PM.png

Screen Shot 2018-02-12 at 1.47.18 PM.png

There are some more steps to be done in this lab but due to the technical problems we are facing in our virtual environment I am not able to continue the lab. 

vSphere HA is a good feature to enterprise. This gives organisations to provide high availability to any application running. 

Main features are
Automatic server failure detection
Resource check
Automatic restart of virtual machine

Screen Shot 2018-02-12 at 1.50.25 PM.png


Lab 20 Using Alarms

Lab 20 Using Alarms

PLEASE NOTE : We are facing a technical issue in our virtual environments at the College. Therefore I am going to describe the labs now onwards without showing any steps or screenshots. When possible I will add images and steps. 

Open the vCentre and select your virtual machine. Click Manage from the virtual machine options and Select Alarm Definitions. 

Screen Shot 2018-02-12 at 12.01.41 PM.png

Click Add to add a alarm. 
From the alarm triggers you select for which conditions you need the Alarm triggers. 

Screen Shot 2018-02-12 at 12.03.21 PM.png

From the actions you can select what to do when alarm(s) is triggered. 

Screen Shot 2018-02-12 at 12.04.26 PM.png

Set alarm triggers to CPU usage. So we can test it easily. 
log into the virtual machine and run the cpubusy.vbs script to get CPU usage high. Check whether alarm is triggering. 

When the alarm is triggered select the alarm and select “Reset to green”

End of the post
Thank you

Lab 19 Monitoring Virtual Machine Performance

Lab 19 Monitoring Virtual Machine Performance

PLEASE NOTE : We are facing a technical issue in our virtual environments at the College. Therefore I am going to describe the labs now onwards without showing any steps or screenshots. When possible I will add images and steps. 

Log into the virtual machine and run cpubusy.vbs script. 

Screen Shot 2018-02-12 at 11.43.36 AM.png

Click the virtual machine the vCentre and click Monitor. Over there you check the virtual machine performances.
Screen Shot 2018-02-12 at 11.44.08 AM.png

Click the Advanced and set the list of performances you would like to check in the virtual machine. 

Screen Shot 2018-02-12 at 11.49.16 AM.png


End of the post
Thank you 

Lab 18 Resource Pools

Lab 18 Resource Pools

PLEASE NOTE : We are facing a technical issue in our virtual environments at the College. Therefore I am going to describe the labs now onwards without showing any steps or screenshots. When possible I will add images and steps. 

Open the virtual machine and run the script from the cpubusy.vbs
Go to the vCentre and right click that virtual machine and click edit settings. And expand the CPU options.
Set Scheduling Affinity as 1
Click OK.
Screen Shot 2018-02-12 at 11.22.21 AM.png

Right click on ESXi host and All vCentre Actions. Then select New Resource pool
Screen Shot 2018-02-12 at 11.24.20 AM.png

Name resource pool as Fine-Test
Shares – Low

Screen Shot 2018-02-12 at 11.26.18 AM.png

Create another resource pool and name it as Fin-Prod and set shares as High.
Assign virtual machines to newly created pools and open the virtual machine and check the running script of cpubusy.vbs.

You can see two different script is running in the low and high pools. 

End of the post
Thank you 


Lab 17 User Permissions

Lab 17 User Permissions

PLEASE NOTE : We are facing a technical issue in our virtual environments at the College. Therefore I am going to describe the labs now onwards without showing any steps or screenshots. When possible I will add images and steps. 

User Permission
In the user permissions any individual can assign with some permissions and restrictions. 

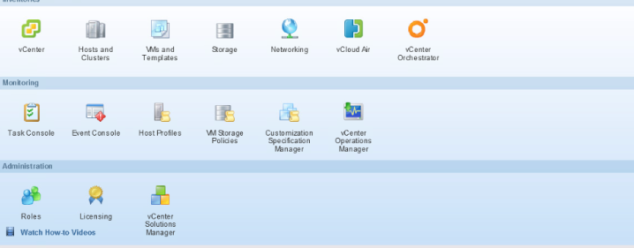
Log into the vCentre and select ‘Administration’ Then Roles.

Screen Shot 2018-02-12 at 10.28.45 AM.png

From the ‘Roles’ section click Create role action.

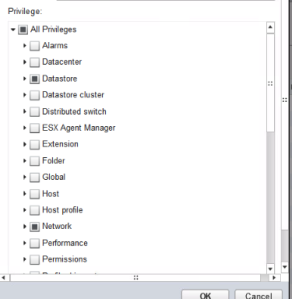
From the role creation wizard give a name to the role and assign all the permission that you want to give to the user.  Click OK. 

Screen Shot 2018-02-12 at 10.32.13 AM.png

Assign permission to vCentre inventory object.

Go to vCentre home and select VM and Templates. 
Screen Shot 2018-02-12 at 10.28.45 AM

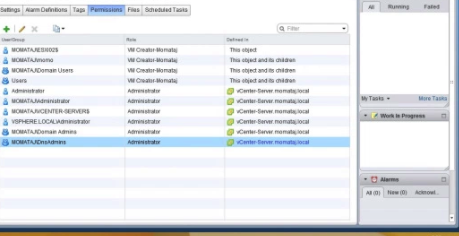
Select Lab VMs and go to permission. 
Click Add. 
Add the user you created in previous step.  Click OK.

Go to vCentre home –>Manage –> Permission
Link the role to the user and Click OK.

Screen Shot 2018-02-12 at 10.39.26 AM

Now logout from your account and try to log into the vCentre from the new user account you have created. 
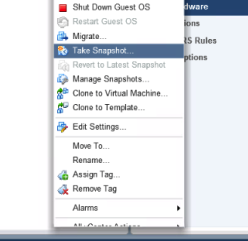
Try to perform some tasks that you gave permission and restricted. 

End of the post
Thank you 

Lab 16 Managing VMware vSphere vApps

Lab 16 Managing VMware vSphere vApps

PLEASE NOTE : We are facing a technical issue in our virtual environments at the College. Therefore I am going to describe the labs now onwards without showing any steps or screenshots. When possible I will add images and steps. 

This lab is about managing vApps. 
vApps is a container of one or more virtual machines in vCentre server inventory. It has several features. Such as, it can power on and off the virtual machine and even can get cloned. 

Log into the vCentre using your credentials and from the main menu select vApps — Create new vApp. 
Follow the instructions and complete vApp creation. 

After you create the vApp you can drag and drop the virtual machines to the newly created vApp.

Go to home –> vCentre –> Host and clusters 
Go to vApp inventory then you will see the virtual machines you have put in the earlier step. 

Right click on the vApp and select edit settings. In there you can change start order as you like. 
Set the ‘Start sequence proceed when” to 20. Click Ok.

Screen Shot 2018-02-12 at 10.03.22 AM

Now right click again on the vApp and select power on. Check tasks and monitor. You will see that both added virtual machines are power on. You can power off and check it too. 

Deleting the vApp
When deleting the vApp, do not delete it at once without moving your virtual machine out from the vApp.  Move out the virtual machines and then delete vApp by right clicking on the vApp.

Lab 15 Managing Virtual Machines

Lab 15 Managing Virtual Machines

PLEASE NOTE : We are facing a technical issue in our virtual environments at the College. Therefore I am going to describe the labs now onwards without showing any steps or screenshots. When possible I will add images and steps. 

First we will delete the virtual machine from the inventory and see what is the result of it. When you delete the machine using “Delete from inventory”
Right click on the machine and select Delete from inventory.

Screen Shot 2018-02-11 at 1.05.05 PM.png

Go to the Virtual machine folder and check the .vmx file. Right click on it and select Register VM. Follow the steps and select the storage and register the VM.

Snapshots
Log to the ESXi host and upload iometer ISO file from the datastore.Copy iometer to the machine desktop and get a snapshot of the virtual machine. 

Them delete the iometer and take another snapshot too. 

Screen Shot 2018-02-11 at 1.18.53 PM

You can manage snapshot of virtual machines. Right click on the virtual machine and click Manage Snapshots. In there you will see two snapshots that you did earlier steps.

From the snapshot manager you can even revert the machine status. That is you can take the machine to the status of the snapshot you have taken. Revert one snapshot and check how it worked. 


Snapshots
Snapshots can take to create a backup of your virtual machine. This will even save the virtual machine settings.